![HRPS Logo1.png]](https://knowledgebase.hrperformancesolutions.net/hs-fs/hubfs/HRPS%20Logo1.png?height=50&name=HRPS%20Logo1.png)
Please note - If you are integrated with Performance Pro, you will complete the import process instead. Click here to learn about that process.
Spreadsheet:
To get started, create a file by pulling a custom report from your payroll or HRIS system using our Data Bridge Setup template as a guideline to show the required, recommended, and optional fields that can be mass uploaded to Compease Employee Master.
The Compease Support team can provide you with this template or users can download a template in Compease.
Data Bridge>Preview & Import>Upload File.
Download Full/Partial Data Bridge Template


The file column headers are not required to match the order or titles shown on the template provided.
A Full Bridge allows users to Add, Update, and Archive employees in Employee Maintenance. The full bridge requires users to include all required fields located in Employee Maintenance on the spreadsheet file.
Key items to consider:
- Employee ID must be in the first column on the spreadsheet and is your employee identifier. Please see Employee Master Report for current Employee IDs.
- Username is optional and will auto populate for new employees if not indicated on the spreadsheet. Please see the Employee Master Report for current Usernames.
- Employee ID’s and Usernames cannot be changed through an import. To update go to User Security>User Information>Edit User or contact Compease support for assistance.
- Employee Names cannot have special characters such as apostrophes.
- Supervisors must be identified by their Employee ID or Username. Supervisor name is not an option for importing.
- Job Titles and Locations must be created first in Compease for a successful Data Bridge.
- Optional columns not being used should be removed from the spreadsheet prior to uploading your spreadsheet. Example: Middle name/initial, Gender, etc.
A Partial Bridge is used to update one or more fields on existing employee records only. The only required field for a partial bridge is the Employee ID. Employees cannot be added or archived through a partial bridge.
The Employee ID, used in Compease, is required to import data. This field can be found on the Employee Master Report. To export an Employee Master Report, go to Employee Reports>Employee Master>By Employee>Next>Export as a CSV.
- Only one header row is
- The Employee ID must be in the first column on the
- If the Employee ID has a leading zero, 1# will need to be added before the zero for the csv file will hold the leading zero. Example: 1#0026
- Remove any of the unused columns from the spreadsheet.
- The file must be saved as a .csv (comma delimited)
Data Bridge>Set Code
Setting Codes and Configurations
- Set Code provides the option to apply a code to any Job Title, Department, Branch, and/or Location.
- Click Edit pencil
- Enter Bridge Code
- Save
Example: The import spreadsheet has the job title as Accountant I, but Compease has the job title as Accountant.
Enter Accountant I in the Bridge Code and Compease will recognize that this job title should be matched to the job title Accountant.

Data Bridge>Configurations
Configurations
Delimiters
- Select Type of Import - Full or Partial
- Select Comma
- Select Import text enclosed in double quotes
- Save

Fields
Arrange fields in the order of the columns on your import spreadsheet.
- Click on the field name
- Drag to appropriate place or use arrows to move up and down
Save

Defaults/Client Codes
Indicates how each category is listed on the spreadsheet. These can be in words, letters or numbers.
- Enter the data on the spreadsheet for the following:
- Performance Rating
- Status
- CE Admin Access
- Pay Basis
- Pay Frequency
- Choose a default for each section.
- Save
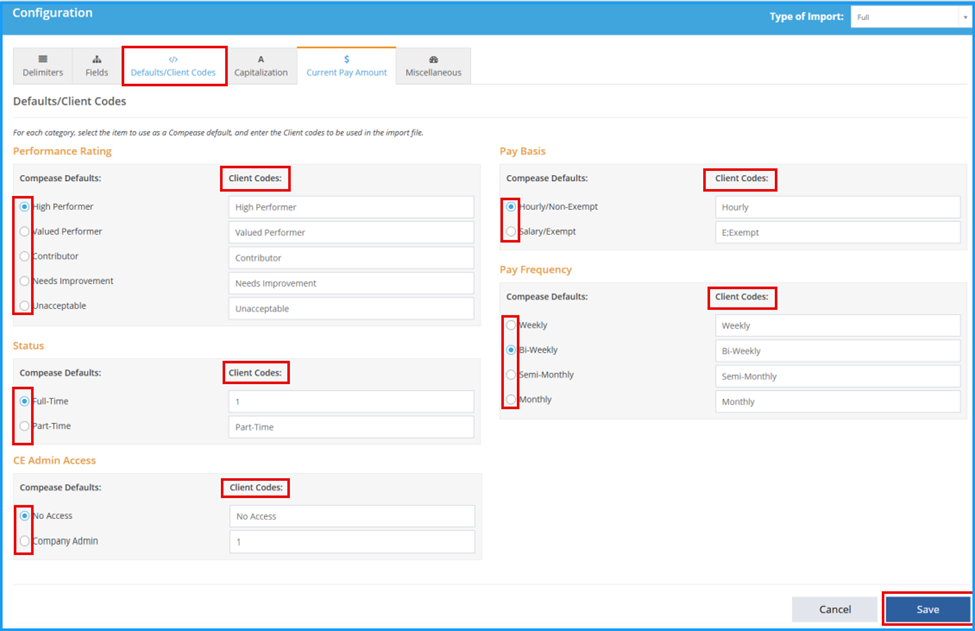
Please Note: The Client Codes cells are used to enter information from your spreadsheet that may appear differently in Compease, so that the system will match to the corresponding field. This is helpful if you use abbreviations, different names, or multiple values in your HRIS system than what is listed in Compease.
Multiple items can be entered into these fields if they are separated by a semicolon without spaces.
Additional defaults
Company Master>Company Settings
- Choose a default for the following:
- Department
- Division/Branch
- Location
- Custom Field
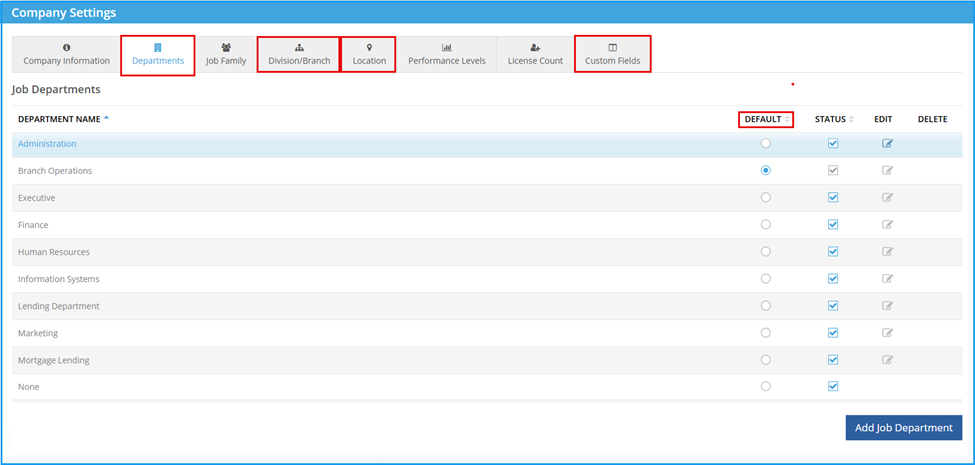
If no changes are made to the Dept/Branch/Location screen, you will want to select Save to set the initial selections the first time you run a bridge, or the system will give you an error message.
Capitalization
Choose the format if you are changing the format on the spreadsheet to one of the listed options.

Current Pay Amount
If payrates are listed on the spreadsheet in another format than an hourly payrate for nonexempt employees and an annual salary for exempt and executive employees, a pay conversion can be selected.

Compease requires any Non-Exempt employees to have their current pay recorded in an Hourly format, and any Exempt or Executive employees to have their pay in an Annual Salary format.
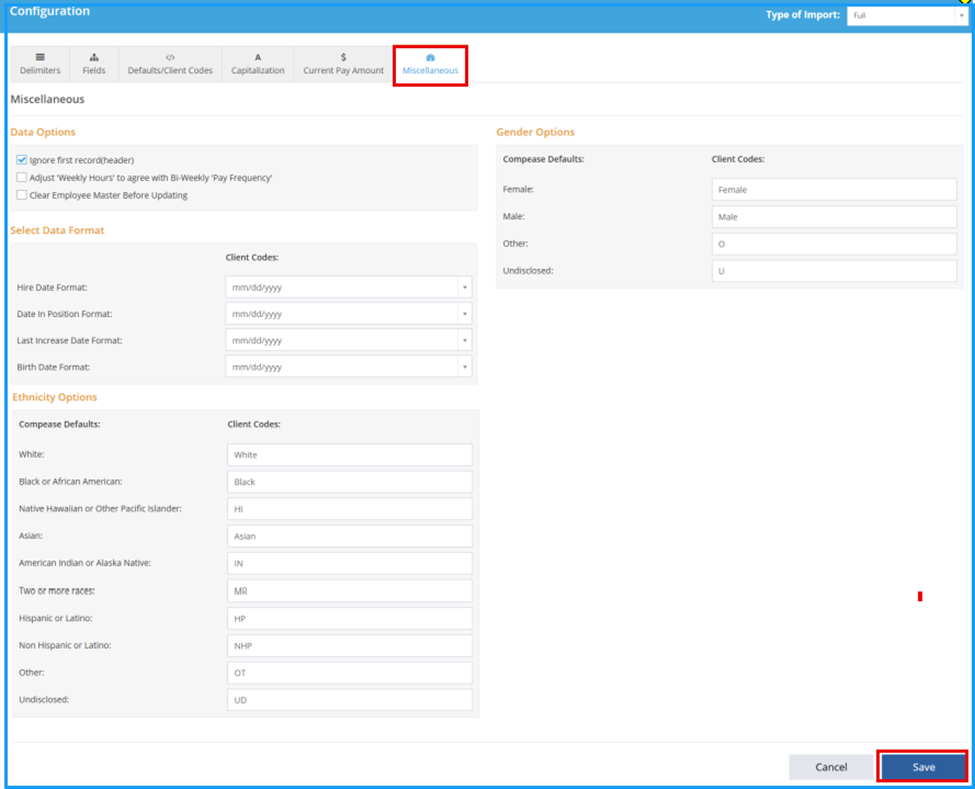
Miscellaneous
Data Options
- Ignore First Record. Check box to include a row for column titles.
- Adjust Weekly hours to agree with Biweekly pay Frequency.
- Clear Employee Master before updating.
- If there are employees in Compease who need to be terminated, this feature will archive employees who are not on the import spreadsheet.
- Uncheck Clear Employee Master Before Updating when only add new employees to your existing data.

Uncheck Clear Employee Master Before Updating to only add new employees to your existing data.
Client Codes
Indicates how each category is listed on your spreadsheet. These can be in words, letters or numbers.
- Ethnicity Options
- Gender Options
Data Bridge>Preview & Import
Preview & Import
Upload File
To upload your spreadsheet for importing
- Add File
- Save
- Ok


Preview & Import
Once the spreadsheet is uploaded, the user will be taken to the Preview & Import page.
- Errors Found notification will populate if there are any warnings or errors with your import.
- Click OK to view your warnings or errors.

Warnings
Warnings will not prevent the user from completing the import. Most warnings will notify the user of the defaults being used. Review your warnings to ensure the defaults are intended and not a missed configuration.
Example: Warning>Location missing>Using default
Warning>No Supervisor ID, using None as the default

Errors
Imports cannot be completed until errors are cleared. Once the errors are cleared, the Import Icon will populate. Click import to complete.
Examples:
Employee- (employee id) Error>Invalid Job Title; Executive VP
- This error will populate if the job title is listed as something different in Job Master or the job is not created in Job Master>Job Maintenance.
Employee- (employee id) Error>Username cannot be changed through the data bridge.
- Usernames and Employee Id’s need to be updated manually in User Security>User Information>Edit User.
Import
- Click import

