Importing Data into Performance Pro
This article outlines the steps needed to create your import template and import the data into Performance Pro.
If your employee information is stored in another program that has the capability to export that data, it can easily be imported into Performance Pro. HR Performance Solutions will assist you with your initial import when setting up your system.
It is recommended that an Import File Template, supplied by HR Performance Solutions, be used for the initial import of employee information when you are setting up Performance Pro. It can also be used as you manage your data, or you can simply use an Excel file you create. Updating information on employees can be done manually by going into each employee record. However, if large amounts of data need to be revised, using the Import feature will save you time. You may import into all Performance Pro fields or just selected fields. You can import information into empty fields or overwrite information already contained in fields. Only Admin users can import data into Performance Pro.
Please note, before you begin the import process, it is recommended that you set up your organization's key information such as appraisal frequency, cycle type, and positions.
Refer to the following help article for instructions on how to import competencies and goals. Importing Content (Competencies/Goals) (hrperformancesolutions.net)
Comma-Delimited File (.csv)
The import file template must be saved as a Comma-Delimited File (.csv).
Formatting Rules for Import File Data
Import File Template Link - Performance Pro
Import File Template Link - Performance Pro/Compease integrated systems
The video link below will walk you through the import file columns.
- Username. The Username cannot start with a zero, include dashes or spaces and must be at least four characters in length. An e-mail address is acceptable.
- Employee ID. Can contain letters and/or numbers.
- Password. Minimum of 8 characters and must contain at least one uppercase letter, one lowercase letter, and one number.
- First Name. Do not include commas.
- Middle Name/Initial. Do not include commas. Enter middle name OR middle initial.
- Last Name. Do not include commas. Acceptable special characters are limited to ‘ (O’Donnal) and – (Smith-Cline.)
- Email address. Needed if email notifications are used.
- Hire Date. Enter in mm/dd/yyyy format.
- Access Level. This is a pre-defined dropdown menu field. Enter one of the following numeric values:
- Employee = 1
- Admin = 2 (Full access to the system)
- Department Admin = 4
- Division Admin = 5
- Location Admin = 6
- Default = Employee if blank
- Advanced Analytics Access-PP. This is a pre-defined dropdown menu field. Enter one of the following numeric values:
- No Access = 0
- Appraiser Access = 1
- Admin Access = 2
- Admin and Appraiser Access = 3
- Is Appraiser. Enter "1" to designate the employee as an appraiser. Enter "0" if the employee is not an appraiser. Employee = default if left blank.
- Position. If the position is not already set up in Performance Pro, the Import will create it.
- Appraiser1 Username. Can be left blank if you are using Employee ID to identify your employees.
- Appraiser1 Employee ID. Can be left blank if you are using Usernames to identify your employees.
- Appraiser1 Weight. Not required if there is only one appraiser. Do not include a % sign, just a number from 1 to 100. When combined with Appraiser 2 Weight (if there is an Appraiser2), it must equal 100.
- Appraiser 2 Username. If there is only 1 Appraiser, leave blank.
- Appraiser 2 Employee ID. If there is only 1 Appraiser, leave blank.
- Appraiser 2 Weight. Use if applicable. Do not include a % sign, just a number from 1 to 100. When combined with Appraiser 1 Weight, it must equal 100.
- Appraisal Cycle. Will default to the setting within: System Setup>Company Settings> Appraisal Settings>Appraisal Cycle field. Enter one of the following numeric values if to be different than the setting:
- Employee Anniversary = 1
- Company-wide Review = 2
- Custom = 3
- Appraisal Frequency. How often will the employee be evaluated? Will default to the setting within: System Setup>Company Settings>Appraisal Settings>Appraisal Frequency field. Enter one of the following numeric values if it is to be different than the setting:
- Monthly = 1
- Quarterly = 2
- Semi-Annually = 3
- Annually = 4
- Custom = 5
- Tri-Annual = 6
- Appraisal Start Date. The first day of the appraisal period in mm/dd/yyyy OR m/d/yyyy format.
- Appraisal End Date. Only needed when the Frequency is set as Custom. The last day of the appraisal period in mm/dd/yyyy OR m/d/yyyy format.
- Due Date. Can be the same as or different from the Appraisal End Date. Enter in mm/dd/yyyy format.
- Self-Appraisal Due Date. Only needed when Self-Appraisal is to be completed by a date other than the Appraisal End Date or Due Date. Enter in mm/dd/yyyy format.
- Overall Goal Weight. Will default to the setting in: System Setup>Company Settings>Appraisal Settings> Goal Weight field. Enter a number if it is to be different than the setting. Do not include a % sign, just a whole number. If not using goals, enter 0.
- Overall Factor Weight. Will default to the setting in: System Setup>Company Settings>Appraisal Settings> Competency Weight field. Enter a number if it is to be different than the setting. Do not include a % sign, just a whole number. If not using Competencies, enter 0.
- Overall Core Value Weight. Will default to the setting in: System Setup>Company Settings>Appraisal Settings> Core Value Weight field. Enter a number if it is to be different than the setting. Do not include a % sign, just a whole number. If not using Core Values, enter 0.
- Department. If Department is not already set up in Performance Pro, the Import will create it.
- Division. If Division is not already set up in Performance Pro, the Import will create it.
- Location. If Location is not already set up in Performance Pro, the Import will create it.
- Is Multi Appraiser. Only needed if using Multi-Appraiser feature. Enter "1" to designate the employee as a Multi-Appraiser. Enter "0" for all others. Will default to 0 if blank.
- Downline View. For Appraisers only. This gives the ability to see appraisals of those below their direct reports. Enter a 1 to give the Appraiser Downline View rights. Enter a 0 for all others. Will default to 0 if blank.
- Downline Edit. For Appraisers only. This gives the ability to edit appraisals of those below their direct reports. Enter a 1 to give the Appraiser Downline Edit rights. Enter a 0 for all others. Will default to 0 if blank. Appraisers must have Downline View in order to be given Downline Edit.
- View Salary Data. Grants the Appraiser access to view their direct and/or indirect report’s salary information. Enter a 1 for yes or a 0 for no.
- Adjust Merit Pay. Grants the Appraiser access to the Adjust Merit Pay table in Performance Pro. Enter a 1 for yes or a 0 for no.
- Last Appraisal Date. This is the date the last appraisal was marked Complete. For informational purposes only. Enter in mm/dd/yyyy format.
- Pay Amount. Enter the hourly or annual pay. Do not use the $ sign or commas. Use cents only if it applies (12.50).
- Status. This is a pre-defined dropdown menu field. Enter one of the following numeric values:
- Not Available = 0
- Part-Time = 1
- Full-Time = 2
- Contractor = 3
- Temporary = 4
- Pay Basis. This is a pre-defined dropdown menu field. Enter one of the following numeric values:
- Not Available = 0
- Hourly/Non-Exempt = 1
- Salary/Exempt = 2
- Pay Frequency. This is a pre-defined dropdown menu field. Enter one of the following numeric values:
- Not Available = 0
- Weekly = 1
- Bi-Weekly = 2
- Semi-Monthly = 3
- Monthly = 4
- Weekly Hours. Enter a numeric value.
- Last Raise Amount. Do not use commas.
- Percentage. Enter one of the following numeric values: If the last raise was a flat rate, enter 0. If the last raise was a % increase, enter 1.
- Pay Grade Min. Enter the minimum dollar amount for the employee’s pay grade. Must be an annual salary without a $ sign. (Example: 35000.00)
- Pay Grade Mid. Enter the mid-point dollar amount for the employee’s pay grade. Must be an annual salary without a $ sign. (Example: 45000.00)
- Pay Grade Max. Enter the maximum dollar amount for the employee’s pay grade. Must be an annual salary without a $ sign. (Example: 55000.00)
- Merit Pay Multiplier. A numerical value that will be multiplied by the projected percent increase to help move an employee to a higher compa-ratio. (Example: 2. Projected increase is 3%. 3% x 2 = 6% increase)
- Pro-Ration. A numerical value that will apply to the pay amount. This is used if an employee has been employed less than a year. (Example: 0.50. Pay amount is 50000.00. 50000.00 x .50 = 25000)
- Salary Grade. Alpha-numeric field for employee’s salary grade.
Compease Related Import File Data Formatting Rules
- Birth Date. Date field.
- Gender. Enter a 1 for Male or a 2 for Female.
- Race/Ethnicity. Enter one of the following numeric values:
- White = 1
- Black or African American = 2
- Native Hawaiian or Other Pacific Islander = 3
- Asian = 4
- American Indian or Alaska Native = 5
- Two or more races = 6
- Hispanic or Latino = 7
- Non Hispanic or Latino = 9
- Other = 11
- Incentive Pay. Do not use the $ sign. Use cents only if it applies (12.50).
- Bonus Pay. Do not use the $ sign. Use cents only if it applies (12.50).
- Sort Field. Can add any alpha or numeric data in this field.
- Change Amount. If the last raise was a flat rate, enter the amount. Do not use the $ sign or commas. If a percentage, enter the percentage number (2.5).
- Percentage. If the last raise was a flat rate, enter a 0. If the last raise was a % increase, enter a 1.
- Last Pay Change Date. Enter date of the last raise if desired.
Create the Import File Using HRPS Template
The import file template supplied by HR Performance Solutions provides formatting and data instructions.
Note: If you wish to import appraisers linked to employees, you must use the appraiser’s Username or Employee ID instead of their name.
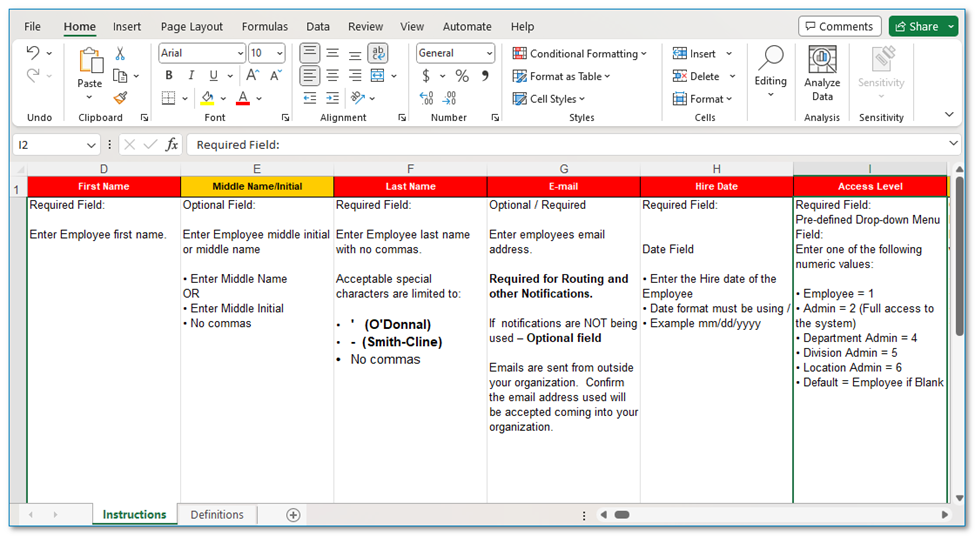
To organize your data using the provided Excel import file template:
- In the Import File template, the first sheet contains the column headers and formatting instructions in rows 1-2. Starting in row 3 is where your data will be entered. The second sheet explains the column header shading.
- The first row can be treated as a header, indicating the type of information listed in the column. Once you no longer need the instructions in row 2, delete row 2. In the import process, mark that there is a header row so that the information in row 1 is not imported.
- Enter your organization's employee data on the first sheet according to the guidelines given in the column headers. Remember, employee information should be entered into the import file EXACTLY as described in the guidelines.
- When the import file is complete, save as a comma-delimited text file (.csv). The file name will be displayed in a historical import listing for future reference.
Please note:
- All import files MUST contain either the Username or the Employee ID so that the data can be imported into the correct employee file.
- The Import File Template provided by HR Performance Solutions contains a data column for all available Performance Pro fields. You only need to enter information into the fields you wish to import. Fields in your import file that are left blank will not affect Performance Pro.
- Data entered incorrectly will not be imported.
- Once the import is run, you will be able to view a list of items that were not imported. These items will need to be manually corrected in the applicable employee file.
Performing an Import
Before running an import, carefully consider the data that will be altered by the import. If an appraiser or position is changed, it could affect the existing current appraisal. Changing a position will alter the Competency list. If an appraiser is conducting an appraisal and the position changes, the scores and comments of some Competencies may be irretrievably lost. If an appraiser is changed mid-appraisal, any data entered in the current appraisal may be removed as well. Before running an import, ensure all applicable appraisals have been completed to avoid losing scores and comments.
Please note, if you import an employee into Performance Pro, you may import over existing information. To ensure that you do not import over important data, double-check your import file data. If you want to keep the information in the program, assign Skip to the Performance Pro field. If you wish to replace the information in Performance Pro, enter new data in the import file.
To perform an import:
1. From the main menu, click Manage Employees, then click Import.
2. If you have previously uploaded your Import File, from the Choose File tab, click the Import file icon beside the Import File you wish to Import. The Template tab will open.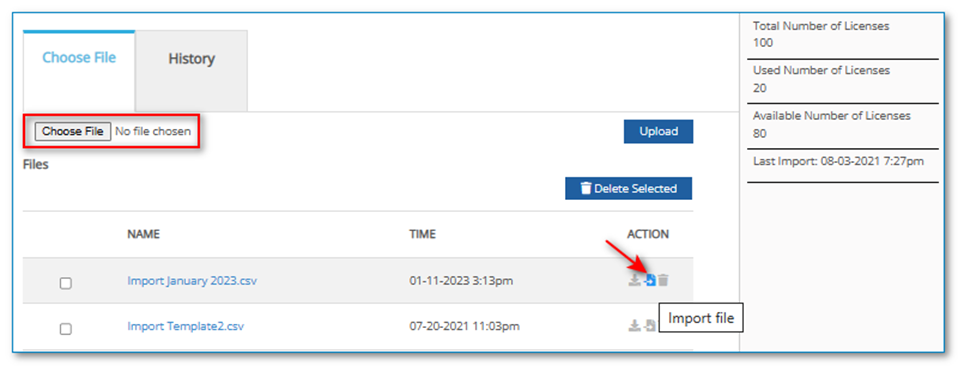
3. If the Import File has not already been uploaded, click Choose File. Navigate to the .csv file you previously saved and double click the file name to select the file. From the Choose File tab, click Upload. The system will upload the file, store it in the Uploaded Files list, and open the Template tab.
4. In the “First Row Contains Data” checkbox, check the box if the first row of your Import file contains employee data that needs to be imported; rather than just a column header.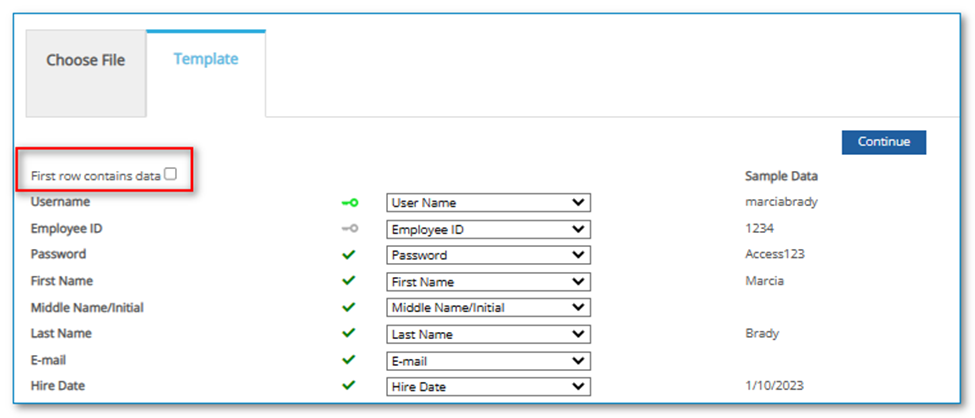
5. If your Import file contains column headers, skip this step and proceed to step 7. From the Template tab you will need to match your data to the Performance Pro fields into which you wish to import.
- The left column contains the data from the import file.
- The next column is a status indicator.
- The next column contains dropdown lists of Performance Pro fields from which to choose.
- The next column, Sample Data, will remain blank in this instance .
6. For each line of data in the first column, map it to the correct Performance Pro field by choosing the appropriate field name from the dropdown list.
7. If your Import File does NOT contain column headers, skip this step and proceed to step 9 below. From the Template tab you will need to match your data to the Performance Pro fields into which you wish to Import. The left column contains the column headers from the Import File. The next column is a status indicator. The next column contains dropdown lists of Performance Pro fields from which to choose. The next columns are Sample Data from your Import File.
8. For each column header that contains employee data in your Import File, map it to the correct Performance Pro field by choosing the field name from the dropdown list. For those column headers with no employee data in the file, choose Skip from the top of the dropdown list.
9. As you choose the field name from the dropdown list, the status indicator will change from red (needs action), to yellow (problem with the action), or to green with a checkmark (ready). The Username and Employee ID fields will change to a gray key icon.
10. The Username and Employee ID fields are considered “keys” to ensure the data is importing to the correct employee file within Performance Pro. Each import file must include at least one of these fields for each employee included in the import. You must designate which of these is the “key” to the import you are performing by clicking on the gray key icon. It will change to a green key icon, indicating it is the “key” for this Import. Only one designated “key” is needed for the Import.
Note: To prevent overwriting of employees or creating duplicate users, you cannot change Usernames or Employee IDs through an import. Changes to Usernames must be made manually through the Administration>Manage Users>Edit User screen. Changes to Employee IDs must be made on the Edit User screen or the Employee Data screen. If the Username and Employee ID in the import file do not match what is currently in Performance Pro, that row will be skipped during the import.
11. When all lines have either been mapped to a Performance Pro field or skipped, and the “key” has been designated, click Continue.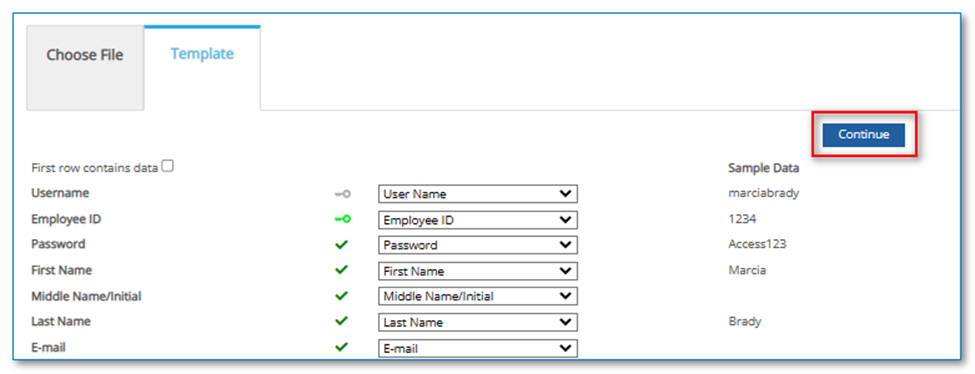
12. If there are problems with your data, they will appear on the Validation tab. If there are no data issues, the Validation tab will not appear. You can print a list of the problems by clicking the Print button. Fix the problems by going back into your .csv file and correcting the information and uploading the file again.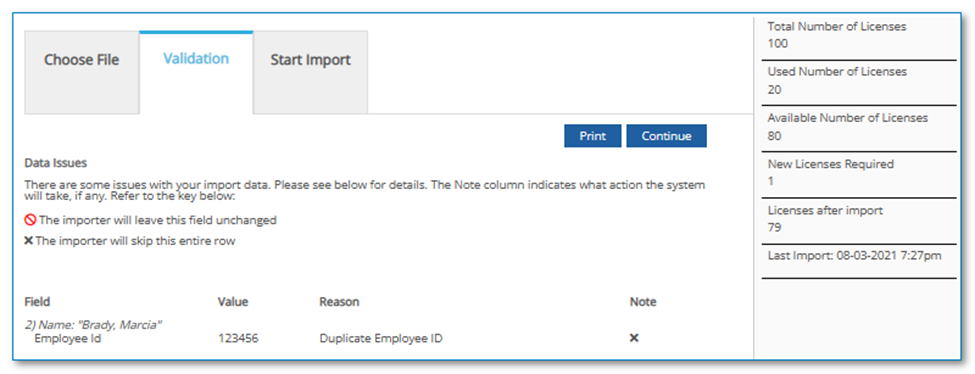
Information on your current licensing is displayed on the right side of the Validation tab. The licensing information is given so you can know if you have enough licenses to cover the changes in employee count made during the Import. If you will not have enough licenses, go to Administration > Admin > License Change Tool to add additional licenses. Or you may terminate employees who have left the organization to free up a license. Once the issues are resolved you may continue with the Import by clicking Continue.
13. If the position you entered in the .csv file does not exist in your Performance Pro system, the New Positions tab will display this information. Click the Create Position checkbox if you would like the import to create the new position and assign the employee to it. Only the position title will be created. Competencies will still need to be assigned to the position. To override the information in your import file, click the edit icon next to the Override Position field to display your system positions. You can choose a position from the list and it will override the position listed in your import file for that employee. Click Continue when all position issues are resolved.
14. When there are no unresolved issues, the Start Import tab will become active. General information on the import process is displayed. When you are ready to run the Import, click Continue.
Note: You do not need to stay on the Start Import screen during the Import process; you may continue to work within Performance Pro, or even close Performance Pro. The import will continue until it is finished.
15. When the import is finished, the Start Import tab will change to a History tab.
Import History
The History tab summarizes the most recent activities relating to the Import feature. Each import creates an entry on the History tab and a results file containing information about the Import. This file is accessed from the History tab. These files will stay active and be accessible for eighteen months.
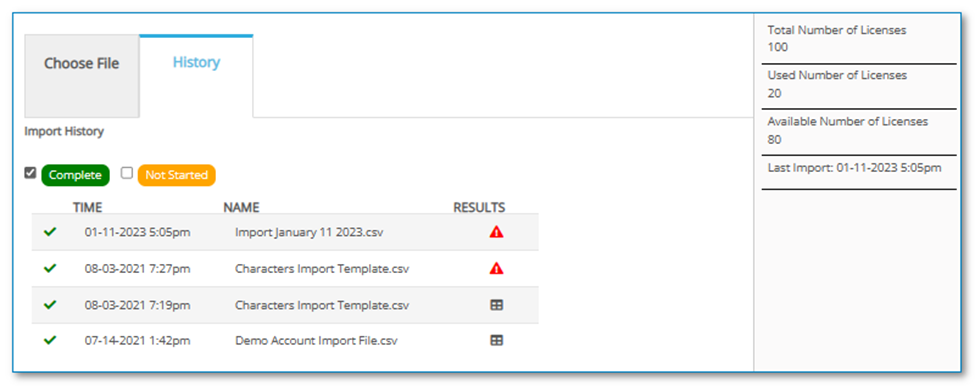
To view the results of the Import:
1. The History tab displays a list of imports that have been run. If the Import was run, but there were problems with the data, an Attention icon will display.
2. From the History tab, click the Results icon next to the results you wish to view.
3. A Results tab will appear and will display a Row Summary which details information from the import by row.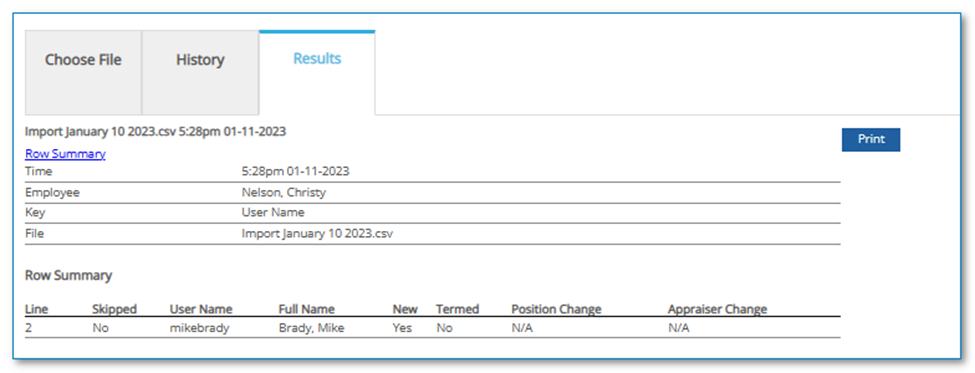
4. If there were problems with data in the import, a Data Issues section will display. It will indicate the row in the import file that contained the problem, what the problem was, and the action which was taken.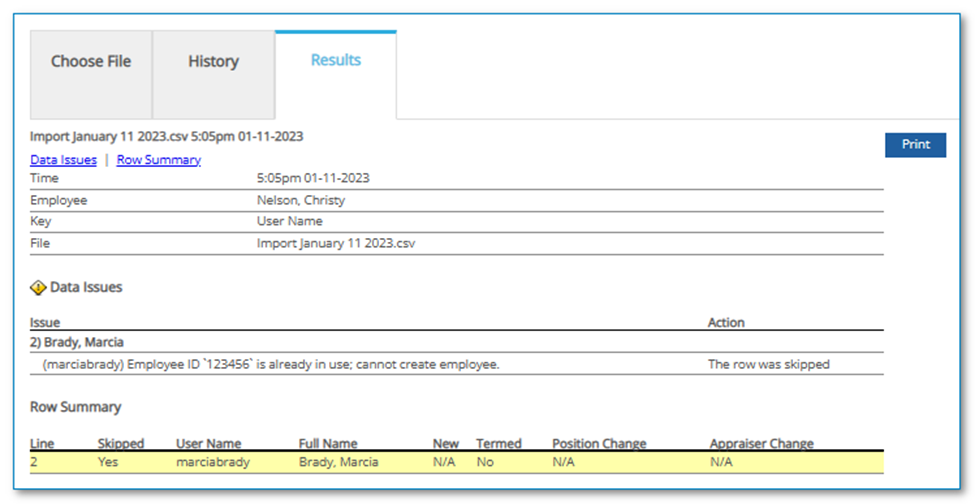
5. Click Print if you wish to print the results.
After the import is completed, check the employee data. If the data was formatted incorrectly, please manually enter the information or correct the information in the import file and re-import.
To download an uploaded import file:
1. From the main menu, click Manage Employees, then click Import.
2. From the Choose File tab, click the Download icon next to the uploaded file you wish to download.
3. Answer any prompts about opening or saving the file.
4. The file will open in Excel.
To delete an uploaded import file:
1. From the main menu, click Manage Employees, then click Import.
2. From the Choose File tab, click the Delete icon next to the uploaded file you wish to delete. In the box that appears, click Cancel to leave the screen without deleting the file or Delete to continue with the file deletion.
3. If you wish to delete multiple files, click in the check box beside each file you wish to delete, then click the Delete Selected button.
To resume an Import that was not completed:
1. From the main menu, click Manage Employees, then click Import.
2. From the Choose File tab, click the Resume icon next to the uploaded file you wish to continue to Import.
Did this answer your question?![HRPS Logo1.png]](https://knowledgebase.hrperformancesolutions.net/hs-fs/hubfs/HRPS%20Logo1.png?height=50&name=HRPS%20Logo1.png)