![HRPS Logo1.png]](https://knowledgebase.hrperformancesolutions.net/hs-fs/hubfs/HRPS%20Logo1.png?height=50&name=HRPS%20Logo1.png)
Navigating to Learning Plans:
- Select the Admin Menu icon
- Select the Library icon
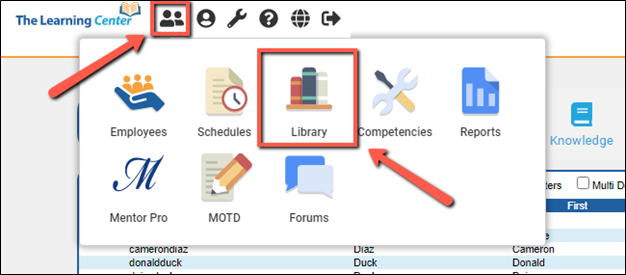
- Select Learning Plans from the Library submenu
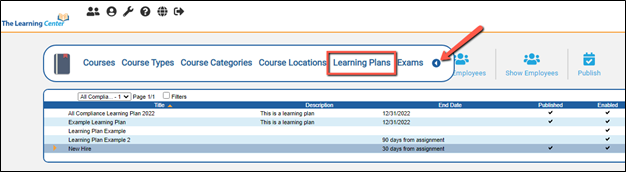
Creating a New Learning Plan:
- Select the New (plus sign) Icon to create a new plan.

-
- Plan Title: Add a title for the plan. Please note that a title is required.
-
Plan Description: A description of the learning plan can be added.
-
Published: As this is a new plan, it will be in an un-published state until published by an Administrator. At that time, course assignments will be pushed out to the appropriate employees.
-
Note: New plans will always start in a NOT published mode
-
-
Enabled: An enabled plan is where course schedules will continue to be made for all employees added to the plan after the initial publish.
-
Note: If disabled, the plan will no longer make course schedules – but that the plan remains in existence.
-
-
Active/Visible: An Active/Visible plan is where the plan, along with corresponding course schedules is visible to employees.
-
Completion Date:
-
Specific Due Date: When selected, all courses will need to be completed by the date indicated. However, a due date for a specific course can be set, as long as it is prior to the plan due date. This will be further explained in a later step.
-
Number of Days: When selected, all courses will need to be completed within the number of days indicated. (Ex. 90 days). However, a due date for a specific number of days can be set, as long as it is prior to the plan due date. This will be further explained in a later step.
-
No End Date
-
-
Click the Update button to save your learning plan
- From the list of Learning Plans, select the learning plan just created, and select the Courses icon to connect courses to the learning plan.
-
-
-
Available Courses Search: If the list of courses should be refined, enter the word in the search box.
-
Show Inactive: If selected, the course list will include inactive courses.
-
Select a course in the available course list. Select the down arrow button to move the course to the Included Courses (bottom) section using the arrows
-
-
TIP: Hold CTRL on your keyboard to select multiple courses
Please Note: Effective May 2023, due dates can be edited for specific courses within a plan after it's published, or for the entire plan. Additionally, courses can be added or removed for a published Learning Plan!

-
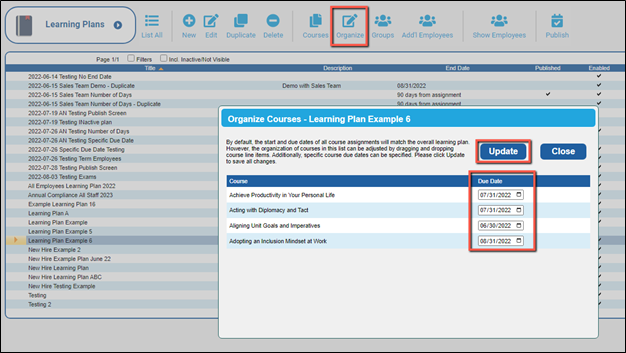
Select the Organize icon to establish an order for the courses to be completed along with custom due dates.
-
Specific Due Date Plans:
-
-
Click and drag on a course to arrange them in a specific order
-
Set individual due dates if desired
-
-
-
-
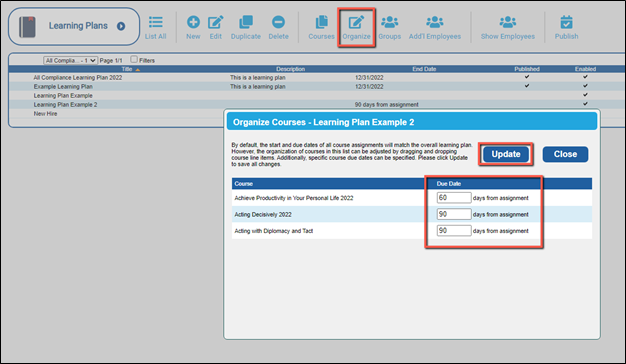
- Number of Days
-
- Click and drag on a course to arrange them in a specific order
- Set number of days for specific courses - ex. 30, 60, 90 days.
-
- Number of Days
-
-
No End Date
-
-
Click and drag for a specific order
-
Set individual due dates if desired
-
-
-

- Select Groups to connect a group of employees to the plan.
-
-
Select the down arrow button to move the group to the Included employee groups (bottom) section using the arrows.
- TIP: Hold CTRL on your keyboard to select multiple groups
- TIP: Hold CTRL on your keyboard to select multiple groups
-
-

-
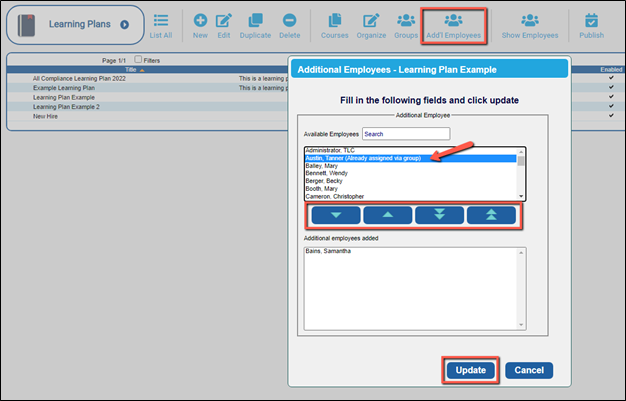
Select Add’l Employees to connect additional employees, not associated with an included group, to the plan.
-
-
Employees previously added through groups will be indicated with “(Already assigned via group)” after their name, as shown in the image below
-
Select the down arrow button to move the employee to the Additional employees added (bottom) section using the arrows
- TIP: Hold CTRL on your keyboard to select multiple employees
- TIP: Hold CTRL on your keyboard to select multiple employees
-
-
- Select Show Employees to review/confirm all employees assigned to the Learning Plan.

- Select Publish to activate the learning plan and schedule all corresponding learning assignments.
-
-
NOTE: Publish is the initial step to enabling the plan and creating course schedules.
- NOTE: Once a learning plan is published you will not be able to edit the courses within the plan
-
-

-
After a plan is published:
-
-
Select the plan for the list of available Learning Plans
-
Click select Edit
-
Un-select the Enabled checkbox to stop future courses assignments from going out for this plan.
-
Un-select the Active/Inactive checkbox to remove visibility of the learning plan from your employee’s view.
-
-

EMPLOYEE VIEW:
Courses assigned through a Learning Plan will be listed in the Registered Training courses, but also will be visible on the newly created Learning Plans tab. This tab will organize the courses according to the Learning Plan that caused the course assignments.
