Performance Pro Update v3.13-Merit Matrix Enhancements
Released on June 7, 2018
What’s New?
The 3.13 release adds a few exciting new features to Performance Pro. The first is the ability to add a new section to your appraisals. The current appraisal sections are Factors and Goals. This new feature allows you to add a third section titled Core Values. This title can be customized to a term appropriate for your organization.
The second feature is the ability to add additional types of appraisals, Concurrent Appraisals, to your system in addition to the default cycling appraisal. This is helpful in many situations such as new hires that may need to be evaluated at 30, 60, and 90 days in addition to an annual (cycling) appraisal. Or you may wish to evaluate an employee on their performance on a specific project. This feature allows you to set up non-cycling appraisal processes.
Third, we have added more capabilities to the Merit Matrix feature. The ranges are now customizable, the system will make merit calculations, and appraisers can make suggested adjustments.
Each of these topics are addressed in separate release documents. This document will explain the Merit Matrix enhancements.
Merit Increases - Merit Matrix
As part of this release, some enhancements have been made to the Merit Increase feature. The Merit Increase feature, which was recently added in release 3.11, is used to help Administrative Users distribute pay increases across the organization, based on the company’s pay philosophy and target budget.
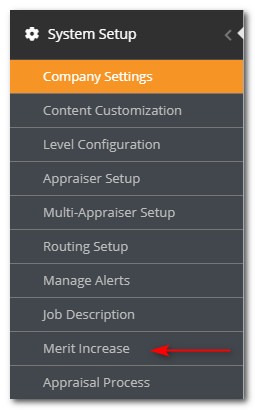
Once Merit Matrix is unhidden from the Hide and Show area of the System Setup > Company Settings screen, a Merit Increase option will appear in the main menu under System Setup for Administrative Users.

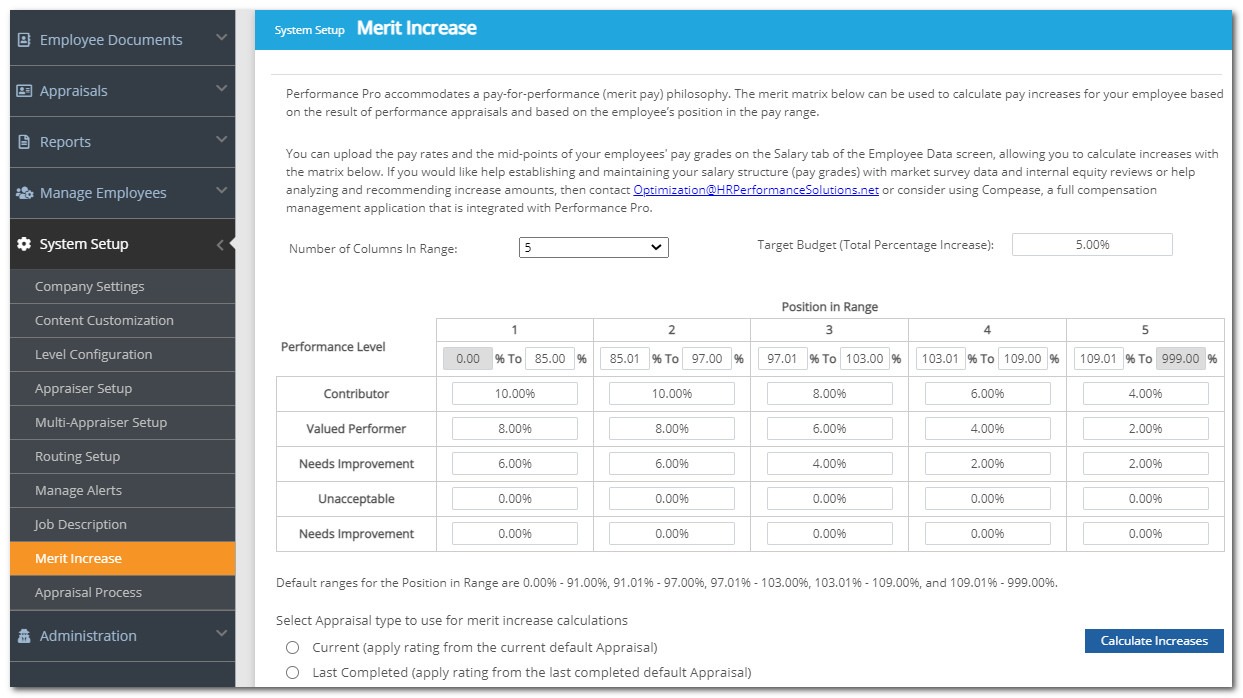
The changes to this feature include:
Customized Merit Matrix Screen Becomes Default
The first step to customizing the Merit Matrix is to select either 3 or 5 columns for the Position in Range. Once this selection is made from the "Number of Columns in Range" dropdown field, you can enter values into the matrix and click Save, making the display the default view whenever you return to this page. Previously, the page reset to the original default when you left the screen.

New Target Budget Field
This is a new field in which you enter the organization’s target budget for increases during the salary planning process. The Target Budget will be multiplied by the Total Current Salary of each appraiser’s team to calculate the Merit Pay Budget. This number will appear on the Adjust Merit Pay table (described below.)

Customizable Compa-Ratio Ranges
Previously the default compa-ratio ranges for each Position in Range were not customizable. You could choose between 3 and 5 columns, but you could not customize the percentage ranges in each column.

With this release, the percentage ranges in each column are now customizable.

When three Position in Range columns are selected, the default ranges will be: 0.00% - 95.00%; 95.01% - 105.00%; 105.01% - 999.00%.
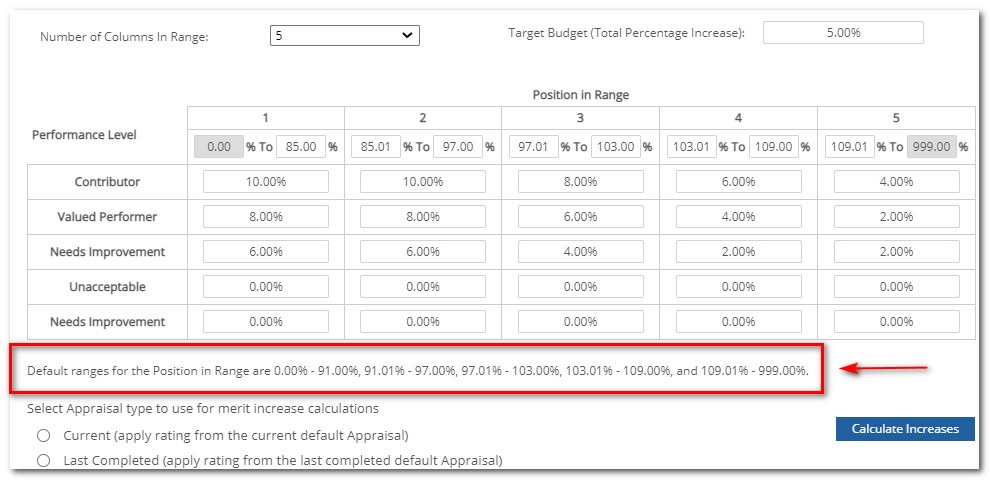
When five Position in Range columns are selected, the default ranges will be: 0.00% - 91.00%; 91.01% - 97.00%; 97.01% - 103.00%; 103.01% - 109.00%; 109.01% - 999.00%.
Customizing the Ranges
You can choose to leave the default ranges or customize them. The range low in column 1 will always be 0.00% and will be locked. Input the desired percentage in the range high box of column 1. Once it is entered, the range low of the next cell will automatically calculate to the range high from the previous cell + 0.01% and will be locked. If you try to manually change this calculation, when you move away from the cell you will receive a message reminding you the auto-calculation cannot be changed.

Continue entering figures in the range high box of each column and the range low in the next column will calculate. The range high in the last column will always be 999.00% and will be locked. Click Save on the toolbar, when you are finished.
The original default ranges will continue to display below the matrix for reference purposes, should you desire to change the fields back to the defaults.
Continue to complete the matrix by entering the desired increase percentages in each field, based on the Performance Level. When all percentages are entered, click Save on the toolbar.

Calculate Increases
Previously, the Merit Matrix was used by Administrative Users as a reference when manually calculating increases. With this release, it can be used to perform calculations based on Salary, Performance Level, and Compa-ratio. Calculations will feed to a new Adjust Merit Pay screen, which can be accessed by appraisers to recommend changes to the proposed increase or decrease amount.
First, customize all fields in the matrix as described above. Second, you must specify the trigger to be used as the basis for the merit increase calculation (the scores from the last completed appraisal or the scores from the appraisal currently in process).
Your options will be:
-
Current (apply rating from the current appraisal): If Concurrent Appraisals is turned on in Company Settings, this option will change to "Current (apply rating from the current default appraisal)." Keep in mind that you may have customized the terms "Default" and "Appraisal" in System Setup > Company Settings > Custom Terms.
-
Last Completed (apply rating from the last completed appraisal): If Concurrent Appraisals is turned on in Company Settings, this option will change to "Last Completed (apply rating from the last completed default appraisal)." Keep in mind that you may have customized the terms "Default" and "Appraisal" in System Setup > Company Settings > Custom Terms.
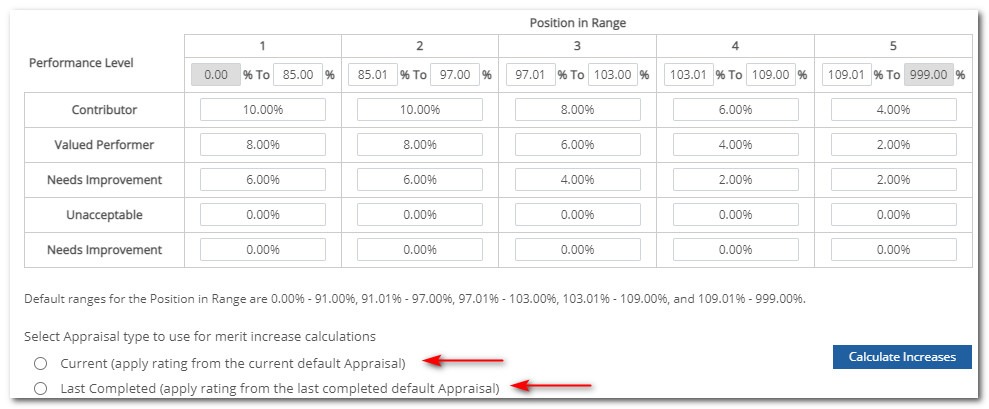
Click the radio button beside the option you wish to use for the calculation. You will only be able to choose one. Once you make this selection, the Calculate Increases button to the right will become active. When you click it, calculations will be performed based upon the scores on the type of appraisal selected and the Merit Matrix as customized. These calculations will feed to the Adjust Merit Pay screen discussed below.
Note: In order for calculations to be performed, the Employee Data > Salary tab must include a current salary and at least a salary range midpoint and maximum, for the calculation of compa-ratios and lump sum increase, respectively.
Note: When the Calculate Increases button is clicked, it will replace any previously generated increase calculations with the newly-generated increase calculations. Only the most recently-generated calculations will display on the Adjust Merit Pay screen. If you wish to save the last calculation, you should export it from the Adjust Merit Pay screen before calculating new increases.

Adjust Merit Pay Feature Activation
The Adjust Merit Pay feature allows appraisers to see/adjust the projected increases for their direct reports (and Downline, if applicable), based on values entered by the Administrative User on the Merit Matrix screen. On the Adjust Merit Pay table, appraisers can give input and propose adjustments to the projected increases.
To activate the Adjust Merit Pay feature for an appraiser, click the Adjust Merit Pay box on the Manage Employees > Employee Data > Settings tab in the Privileges area for the selected employee. Click Save on the toolbar. (This option will only appear if the Merit Matrix feature is activated in Company Settings and the Is Appraiser option is checked for the employee on the Employee Data screen). Adjust Merit Pay must be activated for each appraiser to whom you wish to grant access to the table.
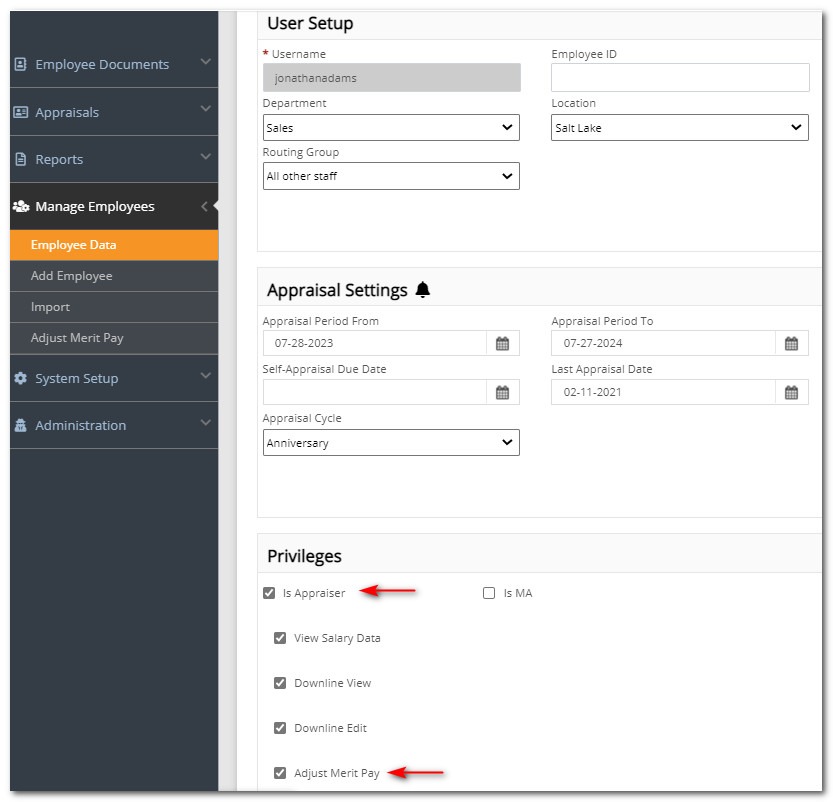
When Adjust Merit Pay is activated, the appraiser will have Downline View and Downline Edit ability for users beneath their direct reports in the Adjust Merit Pay table, depending on their Downline settings.
-
If Downline View is turned on for the appraiser, they will be able to see (read-only) the projected increases for their downline in the Adjust Merit Pay table.
-
If Downline Edit is turned on for the appraiser, they will be able to both see and propose changes to the projected increases for their downline in the Adjust Merit Pay table.
-
If neither Downline View nor Downline Edit is turned on for the appraiser, they will only be able to view and propose changes to the projected increases for their direct reports in the Adjust Merit Pay Table.
Note: When performing imports, the Adjust Merit Pay privilege is an importable field.
Adjust Merit Pay Table for Appraiser Use
When Adjust Merit Pay is turned on for an appraiser (as explained above), an additional option will appear in the Manage Employees menu, titled Adjust Merit Pay. When selected, the Adjust Merit Pay table will appear. Data in this table is replaced each time the Administrative User performs a calculation on the Merit Matrix screen.
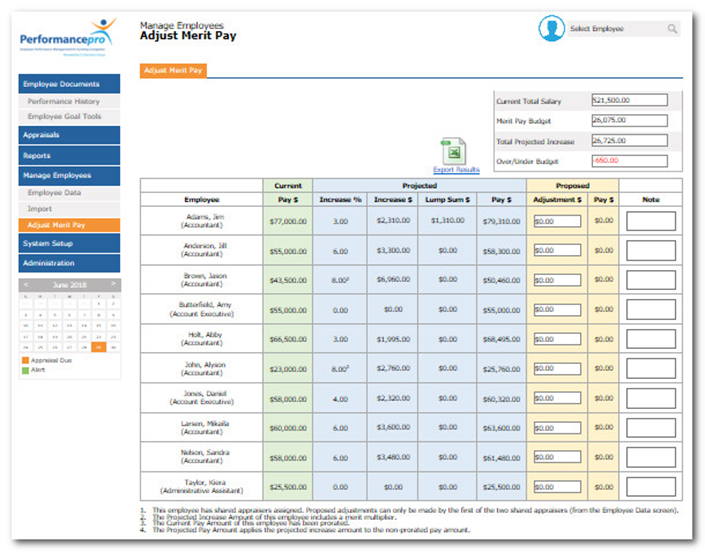
At the top of the screen are four read-only fields which function as follows:
-
Current Total Salary: This field will display the annual sum of the pay amount for all employees assigned to the appraiser in $ amount format (e.g. $160,000.00). Downline view and edit will apply, if turned on for the appraiser, combining the total of all reports in the downline. (Administrative User view will combine totals of all employees, regardless of downline.)
-
Merit Pay Budget: This field multiplies the Current Total Salary field by the Target Budget field from the Merit Matrix screen, displaying as a $ amount (e.g. $4,800.00). This is the budgeted amount of dollars the appraiser has to distribute between their employees. The field will change with any edits made to pay amounts on the Employee Data screen or changes to the Target Budget field.
Example:
Current Total Salary = $160,000.00
Target Budget = 03.00%
Merit Pay Budget = $160,000.00 x 03.00% = $4,800.00
-
Total Projected Increase: This field is the total Projected Increases (based on the Merit Matrix) for employees assigned to the appraiser (Projected Increase $ column) plus any adjustments made by the appraiser in the Proposed Adjustment $ column. Downline view and edit will apply, if turned on, combining the total of all reports in the downline.
-
Over/Under Budget: This field is equal to the Merit Pay Budget field of the appraiser minus the Total Projected Increase field, displayed as a $ amount (e.g. $4,800.00). If the Total Projected Increase field is over budget, the font will be red. If it’s under budget, the font will be green.
Example
Merit Pay Budget = $4,800.00
Total of Projected Amount Increases = $5,000.00
Total of Proposed Adjustments = $4,800 - $5,000 = -$200.00
The columns in the table function as follows:
-
Employee (and position): This information comes from the Employee Data screen.
-
Current Pay: This amount comes from the Employee Data > Salary tab. Salary figures on this tab should be entered in an annual format for purposes of this chart.
-
Projected Increase %: This is the % of increase earned per the Merit Matrix chart. It is based upon their score on the type of appraisal chosen for the calculation trigger (last completed or current) and their position in the salary range (compa-ratio). If there is a zero in this column, it means that either they do not have an appraisal matching the criteria chosen on the Merit Matrix screen, or their Salary tab is missing information.
-
Projected Increase $: This is the Projected Increase % in a dollar format. It is an annual figure.
-
Lump Sum $: If an employee’s position in the salary range is too high to allow the whole earned increase, the amount over the range maximum will appear in the Lump Sum $ column.
-
Pay $: This column is the Current Pay plus any $ from the Projected Increase $ and Lump Sum $ columns.
-
Proposed Adjustment: This column allows the appraiser to enter any increase adjustments they would like to propose, either positive or negative amounts.
-
Proposed Pay $: This is the Pay $ column plus/minus any amount from the Adjustment $ column.
-
Note: Appraisers can enter text (up to 500 characters) in this field, explaining any adjustments they entered.
In certain cases, a superscript number can appear beside specific figures in the columns. The explanation for these numbers appears below the chart, as described below.
#1 means that the employee has been given a merit multiplier (explained below) that is affecting the figure in the Increase % column.
#2 means that the Current Pay amount is a prorated amount. This is used in circumstances where the employee hasn’t been employed for the entire year and therefore isn’t going to earn their normal annual income that year. If an employee is only working part of the year, an applicable figure should be entered in the Proration field on their Salary tab. For example, if the employee worked 8 out of 12 months, the Administrative User could enter 0.75 in the Proration field. It would then multiply the pay amount by the .75 to give a prorated salary.
#3 means the Projected Pay amount is applying the projected increase to the non-prorated salary amount. This gives you a picture of the salary costs when the employee works the whole year, rather than a partial year.
#4 means that the employee has been set up with shared appraisers. Only the shared appraiser who is entered in the first box on the Employee Data screen can make adjustments.
Merit Multiplier
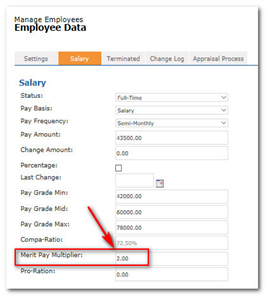
The Merit Pay Multiplier is a new feature with this release. Depending on your pay philosophy, it can be used for employees who are very low in their salary range and whose movement through the range you would like to accelerate, getting them closer to the mid-point of their salary range. Simply enter a figure in the Merit Pay Multiplier field and click Save on the toolbar. It will be applied to their calculated increase % each time a calculation is made. For example, if you enter a 2, their proposed increase % will be multiplied by 2. If their performance/compa-ratio earned them a 4% increase, after applying the multiplier the calculated increase would be 8%.
Export Results
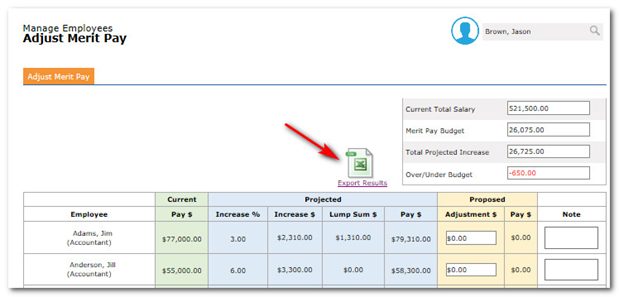
The data from the Adjust Merit Pay chart can be exported into Excel where you can filter and sort the data in any ways that are helpful to you. Click the Export Results link and specify where you wish to save the file. All columns from the table will be exported, in addition to Appraiser(s) name, Merit Pay Multiplier, and any Pro-Ration figure.
Deactivate Appraisal Completion
This new feature can be used to temporarily “freeze” the system from having default appraisals completed, in case the organization needs to go through an approval process for the projected/proposed increases. It also can be used to ensure that the employee does not see the next cycling appraisal prematurely because the appraiser completed it before meeting with the employee.
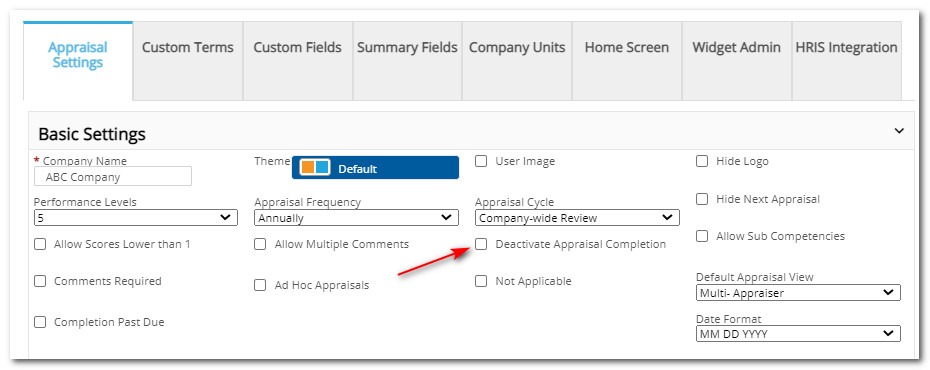
To prevent additional default appraisals from being completed, go to System Setup > Company Settings and check the Deactivate Appraisal Completion box. (You may have customized the word “Appraisal” to a term more suitable to your organization.) This setting will not apply to Concurrent Appraisals, if that feature is turned on.
Note: The Deactivate Appraisal Completion feature will appear on the Company Settings screen whether or not Merit Matrix is turned on.
When the box is checked, the Complete button on the Complete tab of the Finish Appraisal Screen will be removed for all current default appraisals. The appraisals will not be able to be completed until the Administrative User turns off the deactivation.
Did this answer your question?![HRPS Logo1.png]](https://knowledgebase.hrperformancesolutions.net/hs-fs/hubfs/HRPS%20Logo1.png?height=50&name=HRPS%20Logo1.png)