Creating a new Company Form Template - Performance Pro
Terms to Understand When Creating New Forms
-
Form Title. Each Form must have a title. Master Form titles can be customized after copying the Form to the Company list.
-
Employee Information. This information is automatically entered into your Form and includes the following: Employee Name, Employee ID, Position, Department, Division, Location, Appraiser, and Date. You do not need to add these to the text of your Form. They will automatically default with information from the Employee Data screen if that information has been entered.
-
Field Type. As you customize Forms, you will choose a field type, which determines what type of text may be entered in that field (such as Single Line Text Field, Comment Box, Radio Button Group, Checkbox, Drop-Down Group, Date, and Instructions).
-
Single Line Text Field. Allows you to create a question or statement that will be followed by a single-line text box that allows up to 100 characters.
-
Comment Box. Allows you to create a question or statement that will be followed by a text box that allows a large amount of text, up to 4000 characters.
-
Radio Button Group. Allows you to create a list of choices with radio buttons. Users are allowed to select one option from the list of choices.
-
Checkbox. Allows you to create a question or statement that will be followed by one or more checkboxes. This works well for “check here to agree” statements, yes or no questions, or the option to choose more than one item from a list.
-
Drop Down Group. Allows users to select one option from a dropdown list.
-
Date. Allows you to create an empty field with a calendar icon beside it from which to choose a date.
-
Instructions. Allows you to create a header field that requires no input by users.
-
Signatures Lines. This information automatically defaults on your Form and includes the following: Appraiser’s Name, Appraiser’s Signature line, Employee’s Name, Employee’s Signature line, and the name/signature line for users to whom the Form has been routed (if applicable). You do not need to add these to the text of your Form.
-
E-Signature. If E-Signature is activated for your organization, you may add the capability for users to sign the Form electronically.
-
Employee Data Entry in Forms. There may be some instances when you would want an employee to be able to add comments to a Form (in addition to those added by appraisers). Administrative Users can designate which question or comment fields can be completed by employees. Appraisers may then send Forms to employees who, in turn, may enter information in any field to which they’ve been given access. Employees will be able to see all fields but only enter data into employee designated fields.
-
Allow Employee to Initiate. If the Allow Employee Initiate function is activated, employees will have the ability to add that Form to their own record, fill it out, and send it to their manager. It will not have to be initiated by the manager.
To Create a New Form
From the main menu, click System Setup, then Content Customization.
Click the Form Builder tab.
Click Add.

Click Form Properties.
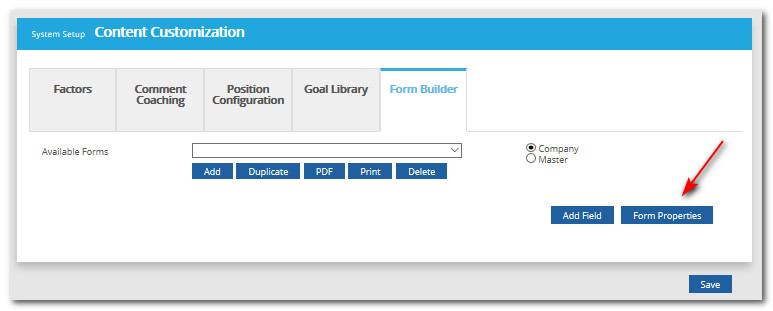
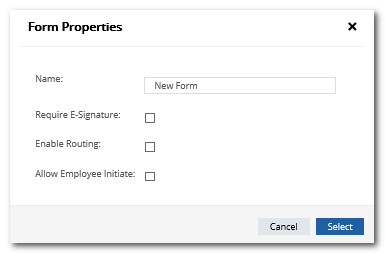
In the pop-up box, "Name" field, highlight the text "New Form" and type the name you wish to give the Form.
Click in the Require E-Signature box, if visible, to add the capability for users to sign the Form electronically.
Click in the Enable Routing box, if visible, if you would like the Form to be able to be routed through different users. Routing will follow the same path as the employee's appraisal.
Click in the Allow Employee Initiate box to give employees the ability to add the Form to their record.
Click Select to save changes or Cancel to return to the Form Builder screen.
Click Save. The Form will now appear in the Available Forms dropdown list. At this point the Form is blank and requires fields to be added to collect the desired information.
To add fields to the Form, choose the Form from the Available Forms dropdown list then click Add Field.
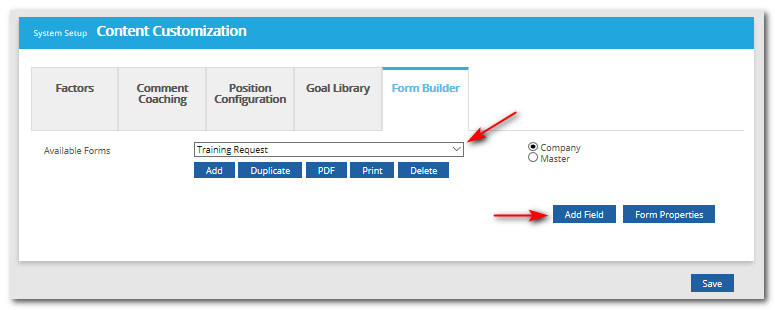
Select the type of field you would like to add from the "Field Type" box. Click on Single Line Text Field, Comment Box, Radio Button Group, Checkbox, Drop-Down Group, Date, or Instructions. As you make your selection, it will preview to the left in the Preview area.
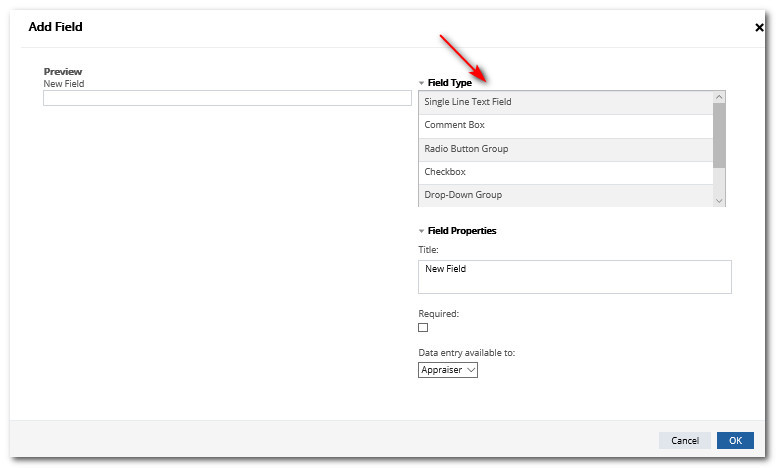
Below the "Field Type" area, click Field Properties and more options will display.
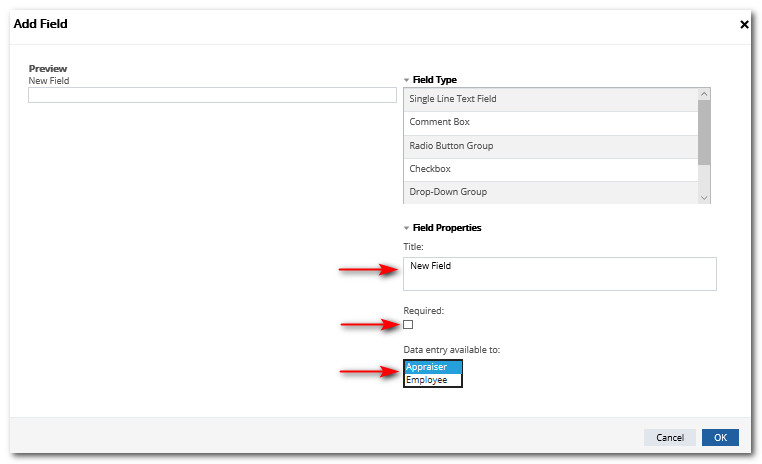
In the "Title" field, highlight the text "New Field" and enter the title for the field.
Click in the Required box if you wish to make it a mandatory field for completion. This would mean the Form could not be marked Complete until data was entered in the field.
Click the "Data entry available to" dropdown list and choose those you wish to give data entry rights to for this field, either Appraisers or Employees. (In order for an employee to initiate or fill out a form, the form must have at least one field with the Data entry available to: Employee marked.)
If you selected Radio Buttons or Drop-Down, an "Options" section will appear. Type the list of options the user will be able to select from in the "Options" box. Press Enter on your keyboard after each one so they will appear in a vertical list. (The left side of the window will illustrate how the Field Properties will appear with your selected Field Type.)
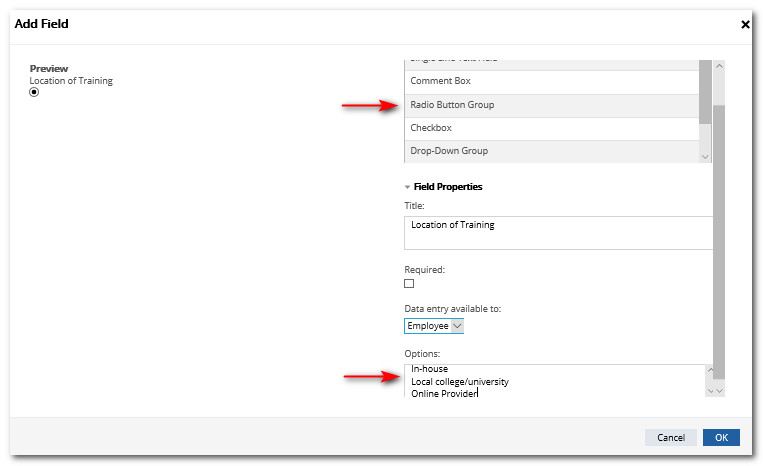
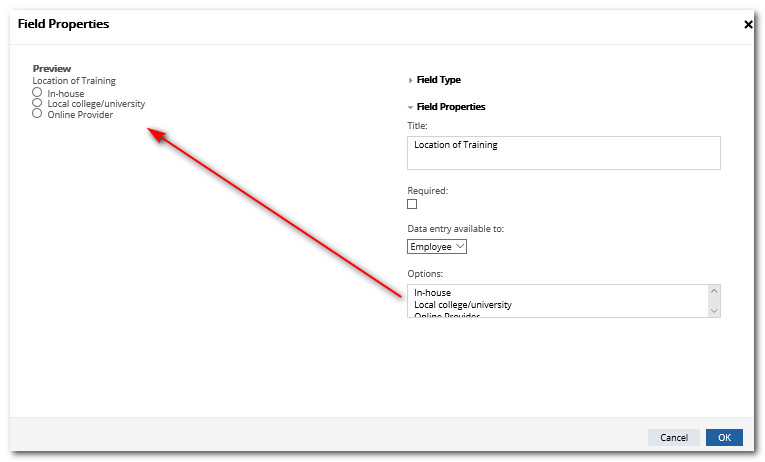
Click OK to save the changes or Cancel to return to the Form without saving. If you chose OK, the field will now display according to the text input and options chosen.
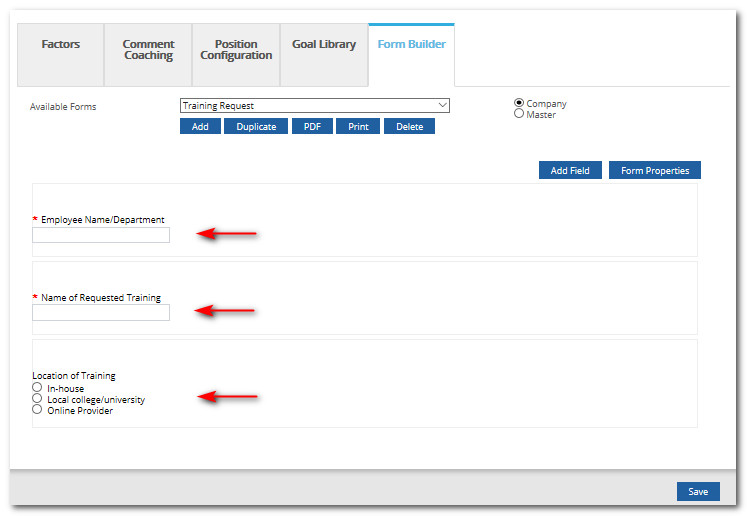
Repeat steps to add additional fields.
If you find you need to edit a field you created, once it appears on the Form Builder tab, hover over that area of the Form and options will display to the right. Click the Edit icon to edit the Field, the up or down arrow to move the field up or down the Form, or the Delete icon to delete the field completely from the Form.
When all fields are added, click Save.
Did this answer your question?
![HRPS Logo1.png]](https://knowledgebase.hrperformancesolutions.net/hs-fs/hubfs/HRPS%20Logo1.png?height=50&name=HRPS%20Logo1.png)