- HR Performance Solutions Help Articles
- The Learning Center
- Employee Maintenance
-
The Learning Center
-
Performance Pro
- Administration / Manage Users
- Employee Documents / Performance History
- Performance Pro Home Screen
- Appraisal
- Employee Documents
- Administration
- System Setup
- Manage Employees / Employee Data
- Manage Employees
- Performance Pro Home Screen / Home Page
- System Setup / Content Customization
- System Setup / Manage Alerts
- System Setup / Routing Setup
- System Setup / Company Settings
- Webinar Materials
- Appraisal / Finish Appraisal
- Administration / Storage
- Advanced Analytics
- Launching Performance Pro
- Settings
-
Performance Pro - Admin User - New Interface
-
Compease
- Compease FAQs
- Merit Increase Planning
- Compease Reports
- Job Master / Job Maintenance
- Data Bridge
- User Security
- Company Master
- Job Master / Salary Survey
- Employee Master / Employee Maintenance
- Job Master / Archived Jobs
- Employee Master / Archived Employees
- Common Functions
- Compease Training
- Compease Integration with Performance Pro
-
Commonly Asked Questions
-
Release Notes
-
Data Integration
-
Performance Pro Manager Training
-
Performance Pro Employee Training
-
Manager Resources
-
Compease Starter
-
New UI Test
-
Performance Pro - Manager Training - New Interface
-
Performance Pro - Employee Training - New Interface
Adding or Editing Groups
Adding or Editing Groups Help for Administrators. Managing Employee Information.
-
Select Employees from the Admin menu.
-
Click the arrow to open the folder next to Employees, then select Groups. The list of Groups records appears.
-
To add a new group record, click New.
-
To edit an existing group record, select the group you want to change then click Edit.
-
The Group screen appears.
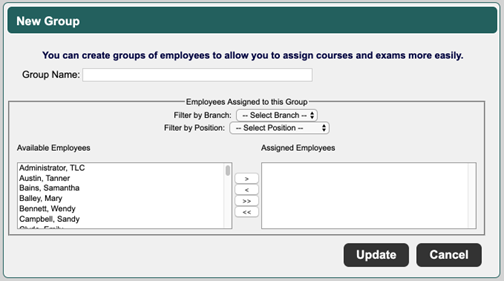
Complete or edit the following fields:
-
Group Name – Enter a short, descriptive name for the group such as a branch name, department name or a specific job title (New Hire, 2023 Compliance, etc.).
-
Filter by Branch, Filter by Position – Select one or more branches and/or positions to filter the list of employees displayed in the Available Employees pane. To select multiple branches or positions, press CTRL, then select multiple items.
-
Select and move employees that you want to assign to this group from the Available Employees pane to the Assigned Employees pane.
-
Click Update to save the new group.